Showing posts with label Tutorials. Show all posts

Tuesday, 15 July 2014

MTK devices running KITKAT Easter Egg

http://www.droid-life.com/wp-content/uploads/2013/11/DSC077031.jpg


Most MTK devices can't upgrade their android version (easter egg)
So i will tel you how to make MTK device look like kitkat ..

Tested with GT-9500 MTK 6572

First .. You need

MTK Device with rooted and CWM


You need

1.Xposed installer (google it as it may differ from one phone to the other)
2.Gravitybox
3.Eagster egg (eggster)
4.Kitkat battery white.zip
5.Edit build.prop

How to install

1.Install Xposed
2.Open Xposed - Framework - install/update ..then reboot
3.Open Xposed - Download - Search GravityBox And Easteregg then download
4. Go to Module . Activate them .. Reboot
5. Open gravity box - status bar - status bar color.. Make it white
6 .Flash kitkat battery white.zip
7 After that open eagster egg .. Then make it on in kitkat line
8. With root explorer .. open system - app - build.prop .. open then on build prop .. Replace all 4.4.2 name with 4.4.2

Reboot ..

Done ..

So if you open settings - about .. You will see 4.4.2 and tap 3 times .. You will see kitkat

Screenshots


I not responsible if your phone gets bricked .


 NEED ANY ASSISTANCE JUST COMMENT BELOW
 

Thursday, 3 July 2014

How to install the Android L developer preview on your Nexus 5 or Nexus 7

http://files.tested.com/photos/2014/06/29/62231-android-l-tested.jpg 

By now, you might already know a thing or nine about Android L, the latest version of Google’s mobile operating system. You may also know that developer previews for the Nexus 5 and Nexus 7 (2013) are now available to download and install. They're hardly in final form and not totally stable, but you can install them on your own accord, and I’m going to show you how. 

Note: This method is relevant for installing any and all Android factory images from Google for Nexus phones or tablets. If you want to go back to another version of the OS, simply download the appropriate file from here and perform the same steps below!

Prerequisites:
First up, head over to this link to download the Android L developer preview. The builds are named by the devices' code names: the code name for the Nexus 5 is Hammerhead and the Nexus 7 is Razor. After the file is finished downloading, extract it to your desktop for later use. The extracted file will be a folder named either hammerhead-lp79 or razor-lp79.
Now, find the folder that the ADB and Fastboot files currently reside in and open it. Open the folder your just extracted, highlight all of the files and drag them into the ADB folder.


dragdropfiles

Open a command window to your ADB folder by holding down the Shift button on your keyboard and right click on the open folder. Click on the Open command window here option. (On a Mac you'd use Terminal.)

Just to make sure everything is correctly setup, we’re going to run a few commands first.

In the command window, type in adb devices. The window should return List of attached devices with a combination of letters and numbers below it. (something like 01vu6m6633fgh39r    device).

If you do not see this after typing adb devices, something is wrong and you won’t be able to continue until it is fixed. Assuming your device was found, type in the following command to boot your phone into bootloader mode: adb reboot bootloader


adbcommand

Give the phone a few seconds to boot into bootloader mode, and then type the following: flash-all.bat. This will begin the flashing process.

After a few minutes, your Nexus 5 or Nexus 7 will reboot. You’ll be presented with the new boot animation, and it may take a while to fully boot up, so give it some time. You’re good to go!

In short:
  • Download file
  • Extract
  • Move files into the same folder as ADB
  • Open command window from ADB folder
  • Connect phone: (test connection: adb devices)
  • adb reboot bootloader
  • flash-all.bat

  NEED ANY ASSISTANCE JUST COMMENT BELOW

Wednesday, 2 July 2014

How to ROOT Virtual Device (AVD) with Root Genius

https://blogger.googleusercontent.com/img/b/R29vZ2xl/AVvXsEh510MLr7U5Z_vVHuRwR1aPmBndSoWLKyDmTTi7WR_K50RvUg7jk7TtABRf6H5KNvt0Ti7lke21V0fa4v5ZnC2GZghYmrTEhwZsX3b3paQGRtdTihShB-GST04szCOZy7p3-z5oKEjhYgk/s1600/Root+Genius+-+pic1.jpg

Instructions

1. Disconnect all youre real Devices from youre Computer

2. Start Root Genius

3. Start a virtual Device

4. Root Genius tell you device is rooted, ignor it, and press Quick root. else Press root. (this take some minutes)

5. Your AVD is now rooted

Root Genius

 http://kaz.dl.sourceforge.net/project/eddy-edifycodeeditor/Eddy.tar.gz

  NEED ANY ASSISTANCE JUST COMMENT BELOW

How to increase internal storage on your Android device (MOTHOD #2)

http://i2.wp.com/gearnuke.com/wp-content/uploads/2014/02/581622187_1370721611.jpg 


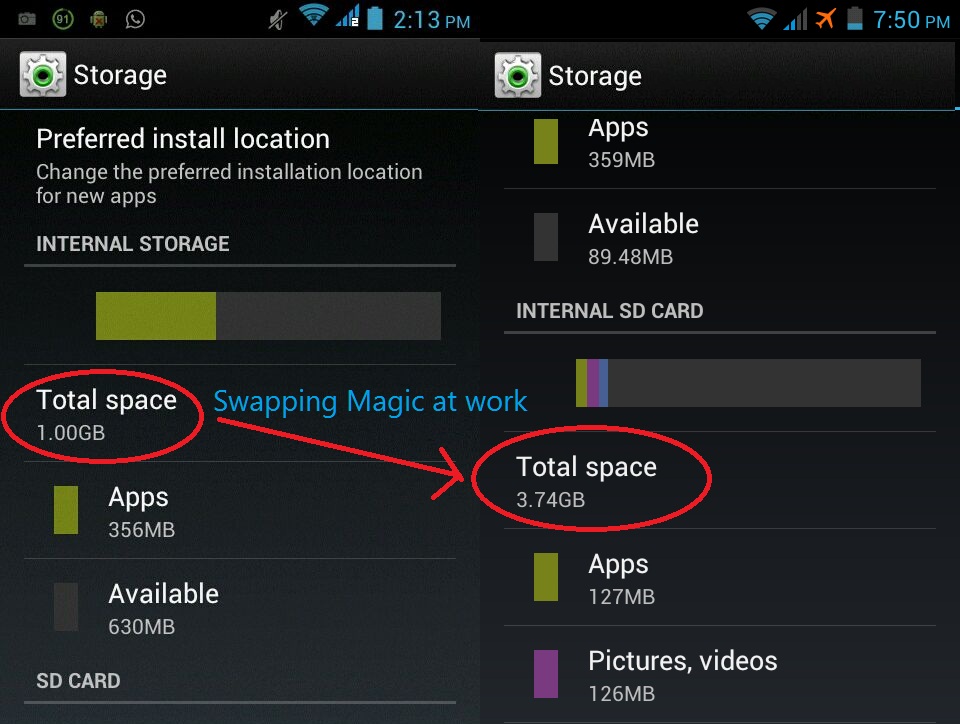
Many times android users face the problem of low phone memory. It is often required to download large HD games via Play Store. But unfortunately because of low space, you do not get to do so. You say many bad things about your device, but not no need of all those things, swapping of the SD card (phone stoorage) with an external SD card will work.

Requirements:

1] A fully-rooted android device.
2] Root Browser.

Note:

MAKE A NANDROID BACKUP!!!

Here are the steps:

1] First of all keep in mind that this will work only if the phone is rooted. So if you are not, go ahead and search google on how to root your device.

2] Download and open Root Browser (any). Go to system/etc and find the file 'vold.fstab'. Make a backup of that file and save a copy of it somewhere ( for restoring it if anything goes wrong ).

3] Open that file as a text file.

4] Find these lines: (the may vary from device to device. This is for canvas series. May be same for others like sony, etc.)

Code:
dev_mount sdcard /storage/sdcard0 emmc@fat /devices/platform/goldfish_mmc.0 /devices/platform/mtk-msdc.0/mmc_host
dev_mount sdcard2 /storage/sdcard1 auto /devices/platform/goldfish_mmc.1 /devices/platform/mtk-msdc.1/mmc_host
5] Replace sdcard0 with sdcard1. (Underlined)

6] Do the same with next line. Replace sdcard1 with sdcard0. (vice versa)

7] Save the file and reboot.

Tested this on Micromax Canvas Juice, Xperia L and Xperia ZR.

 NEED ANY ASSISTANCE JUST COMMENT BELOW

Droid Razr boot animation with sound for Android

http://i1.ytimg.com/vi/OrbO-vwHMWA/maxresdefault.jpg
 
Hello guys, do you want to take your android device to a higher level? Go grab this boot animation. This is my all-time favorite boot animation which I am going to share with you.

Warnings
  • FOR HDPI DEVICES (480x854)

  • MAKE A NANDROID BACKUP BEFORE DOING ANYTHING AND DON'T BLAME ME  FOR BOOTLOOPS

STEPS:

1. Download the file from below.

2. Open root explorer (download from play store).

3. Go to /system/media and paste the file there.

4. Extract bootaudio.zip and Copy bootaudio.mp3 to /system/media (check if a file with same name exists there)

Or

Extract PowerOn.zip and copy poweron.ogg to /system/media/audio/ui (check if a file with same name exists there)

5. Fix the permition of poweron.ogg to rw-r-r

6. Reboot

7. Enjoy


Downloads

Power On.zip
http://kaz.dl.sourceforge.net/project/eddy-edifycodeeditor/Eddy.tar.gz

Boot animation.zip

http://kaz.dl.sourceforge.net/project/eddy-edifycodeeditor/Eddy.tar.gz

Boot audio.rar

http://kaz.dl.sourceforge.net/project/eddy-edifycodeeditor/Eddy.tar.gz


NEED ANY ASSISTANCE JUST COMMENT BELOW

Tuesday, 24 June 2014

Add 6 lockscreens Mod + Lockscreen Gestures on Android

http://i.kinja-img.com/gawker-media/image/upload/s--vYuWMvSY--/c_fit,fl_progressive,q_80,w_636/1866lt2cih2n1png.png

 Files To be downloaded :

1. android.policy.zip
2. Lidroid-res.apk
3. Lidroid-Parts


Files to be Affected :

1. android.policy.jar
2. systemui.apk (only if you have added 14 status bar toggles before)


Steps :

-Pullout android.policy.jar from '/system/framework' (Must be Deodexed)
-Decompile it (Please dont expect a guide on how to decompile)
-Extract the android.policy.zip file
-copy the smali folder to directory where you decompiled your android.policy.jar

-Now open this file android.policy.jar.out\smali\com\android\internal\ policy\impl\KeyguardUpdateMonitor.smali and make the following changes :

-At the begining after '#annonations' search for this line "Lcom/android/internal/policy/impl/KeyguardUpdateMonitor$AirplaneModeChangeCallback;"

after that add this line

Code:
Lcom/android/internal/policy/impl/KeyguardUpdateMonitor$MediaStateCallback;,

-Now find this line ".field private mLockscreenWallpaperDrawable:Landroid/graphics/drawable/Drawable;"

-Below it paste this line
Code:
.field private mMediaCallbacks:Ljava/util/ArrayList;
    .annotation system Ldalvik/annotation/Signature;
        value = {
            "Ljava/util/ArrayList",
            "<",
            "Lcom/android/internal/policy/impl/KeyguardUpdateMonitor$MediaStateCallback;",
            ">;"
        }
    .end annotation
.end field
-Find this line ".field private mWallpaperModeValue:I"

and jus below paste this

Code:
.field private timezone:Ljava/lang/String;
-Now find this method ".method private handleSimStateChange(Lcom/android/internal/policy/impl/KeyguardUpdateMonitor$SimArgs"

and above it paste this :

Code:
.method private handleMediaUpdate(IILandroid/net/Uri;)V
    .locals 5
    .parameter "isPlaying"
    .parameter "isStop"
    .parameter "mediaUri"

    .prologue
    const/4 v4, 0x0

    const/4 v3, 0x1

    .line 467
    if-ne p1, v3, :cond_0

    move v0, v3

    .line 468
    .local v0, bIsPlaying:Z
    :goto_0
    if-ne p2, v3, :cond_1

    move v1, v3

    .line 470
    .local v1, bIsStop:Z
    :goto_1
    const/4 v2, 0x0

    .local v2, i:I
    :goto_2
    iget-object v3, p0, Lcom/android/internal/policy/impl/KeyguardUpdateMonitor;->mMediaCallbacks:Ljava/util/ArrayList;

    invoke-virtual {v3}, Ljava/util/ArrayList;->size()I

    move-result v3

    if-ge v2, v3, :cond_2

    .line 471
    iget-object v3, p0, Lcom/android/internal/policy/impl/KeyguardUpdateMonitor;->mMediaCallbacks:Ljava/util/ArrayList;

    invoke-virtual {v3, v2}, Ljava/util/ArrayList;->get(I)Ljava/lang/Object;

    move-result-object v3

    check-cast v3, Lcom/android/internal/policy/impl/KeyguardUpdateMonitor$MediaStateCallback;

    invoke-interface {v3, v0, v1, p3}, Lcom/android/internal/policy/impl/KeyguardUpdateMonitor$MediaStateCallback;->onMediaUpdated(ZZLandroid/net/Uri;)V

    .line 470
    add-int/lit8 v2, v2, 0x1

    goto :goto_2

    .end local v0           #bIsPlaying:Z
    .end local v1           #bIsStop:Z
    .end local v2           #i:I
    :cond_0
    move v0, v4

    .line 467
    goto :goto_0

    .restart local v0       #bIsPlaying:Z
    :cond_1
    move v1, v4

    .line 468
    goto :goto_1

    .line 473
    .restart local v1       #bIsStop:Z
    .restart local v2       #i:I
    :cond_2
    return-void
.end method

-Now find this line ".method public getFailedAttempts()I"

above it again paste this :
Code:
.method public getChangedTimeZone()Ljava/lang/String;
    .locals 1

    .prologue
    .line 1131
    iget-object v0, p0, Lcom/android/internal/policy/impl/KeyguardUpdateMonitor;->timezone:Ljava/lang/String;

    return-object v0
.end method

this one's last for this file, search for ".method public isDevicePluggedIn()Z"

and above it paste :

Code:
.method public isDeviceCharged()Z
    .locals 2

    .prologue
    .line 866
    iget v0, p0, Lcom/android/internal/policy/impl/KeyguardUpdateMonitor;->mBatteryLevel:I

    const/16 v1, 0x64

    if-lt v0, v1, :cond_0

    const/4 v0, 0x1

    :goto_0
    return v0

    :cond_0
    const/4 v0, 0x0

    goto :goto_0
.end method
-Now close this file and open "\smali\com\android\internal\policy\impl\LockPatte rnKeyguardView"

-Search for this method now ".method createLockScreen()Landroid/view/View;"
Find this (Jus one line below)
Code:
    .prologue
    .line 868
below it paste this :

Code:
    const/4 v2, 0x0

    const/4 v0, 0x0

    iget-object v3, p0, Lcom/android/internal/policy/impl/LockPatternKeyguardView;->mContext:Landroid/content/Context;

    invoke-virtual {v3}, Landroid/content/Context;->getContentResolver()Landroid/content/ContentResolver;

    move-result-object v3

    const-string v4, "lockscreen_style_pref"

    invoke-static {v3, v4, v2}, Landroid/provider/Settings$System;->getInt(Landroid/content/ContentResolver;Ljava/lang/String;I)I

    move-result v0

    const/4 v2, 0x1

    if-eq v2, v0, :cond_3

    const/4 v2, 0x2

    if-eq v2, v0, :cond_3

    const/4 v2, 0x3

    if-eq v2, v0, :cond_3

    const/4 v2, 0x4

    if-eq v2, v0, :cond_3

    const/4 v2, 0x5

    if-eq v2, v0, :cond_3

    if-eqz v0, :cond_0

    .line 869
    const/4 v2, 0x0

    const/4 v0, 0x0

    iget-object v3, p0, Lcom/android/internal/policy/impl/LockPatternKeyguardView;->mContext:Landroid/content/Context;

    invoke-virtual {v3}, Landroid/content/Context;->getContentResolver()Landroid/content/ContentResolver;

    move-result-object v3

    const-string v4, "lockscreen_style_pref"

    invoke-static {v3, v4, v2}, Landroid/provider/Settings$System;->getInt(Landroid/content/ContentResolver;Ljava/lang/String;I)I

    move-result v0

    const/4 v2, 0x6

    if-eq v2, v0, :cond_2

    const/4 v2, 0x7

    if-eq v2, v0, :cond_1

    :cond_0
    new-instance v0, Lcom/android/internal/policy/impl/LockScreen;

    iget-object v1, p0, Lcom/android/internal/policy/impl/LockPatternKeyguardView;->mContext:Landroid/content/Context;

    iget-object v2, p0, Lcom/android/internal/policy/impl/LockPatternKeyguardView;->mConfiguration:Landroid/content/res/Configuration;

    iget-object v3, p0, Lcom/android/internal/policy/impl/LockPatternKeyguardView;->mLockPatternUtils:Lcom/android/internal/widget/LockPatternUtils;

    iget-object v4, p0, Lcom/android/internal/policy/impl/LockPatternKeyguardView;->mUpdateMonitor:Lcom/android/internal/policy/impl/KeyguardUpdateMonitor;

    iget-object v5, p0, Lcom/android/internal/policy/impl/LockPatternKeyguardView;->mKeyguardScreenCallback:Lcom/android/internal/policy/impl/KeyguardScreenCallback;

    invoke-direct/range {v0 .. v5}, Lcom/android/internal/policy/impl/LockScreen;-><init>(Landroid/content/Context;Landroid/content/res/Configuration;Lcom/android/internal/widget/LockPatternUtils;Lcom/android/internal/policy/impl/KeyguardUpdateMonitor;Lcom/android/internal/policy/impl/KeyguardScreenCallback;)V

    goto :goto_0

    :cond_1
    new-instance v0, Lcom/android/internal/policy/impl/LockScreen;

    iget-object v1, p0, Lcom/android/internal/policy/impl/LockPatternKeyguardView;->mContext:Landroid/content/Context;

    iget-object v2, p0, Lcom/android/internal/policy/impl/LockPatternKeyguardView;->mConfiguration:Landroid/content/res/Configuration;

    iget-object v3, p0, Lcom/android/internal/policy/impl/LockPatternKeyguardView;->mLockPatternUtils:Lcom/android/internal/widget/LockPatternUtils;

    iget-object v4, p0, Lcom/android/internal/policy/impl/LockPatternKeyguardView;->mUpdateMonitor:Lcom/android/internal/policy/impl/KeyguardUpdateMonitor;

    iget-object v5, p0, Lcom/android/internal/policy/impl/LockPatternKeyguardView;->mKeyguardScreenCallback:Lcom/android/internal/policy/impl/KeyguardScreenCallback;

    invoke-direct/range {v0 .. v5}, Lcom/android/internal/policy/impl/LockScreen;-><init>(Landroid/content/Context;Landroid/content/res/Configuration;Lcom/android/internal/widget/LockPatternUtils;Lcom/android/internal/policy/impl/KeyguardUpdateMonitor;Lcom/android/internal/policy/impl/KeyguardScreenCallback;)V

    goto :goto_0

    :cond_2
after ':cond_2' there will be your default lockscreen so dont leave any line between them.

After the end of your default lockscreen , it might be like this
" invoke-direct/range {v0 .. v5}, Lcom/android/internal/policy/impl/CircleLockScreen;-><init>(Landroid/content/Context;Landroid/content/res/Configuration;Lcom/android/internal/widget/LockPatternUtils;Lcom/android/internal/policy/impl/KeyguardUpdateMonitor;Lcom/android/internal/policy/impl/KeyguardScreenCallback
"
paste this
Code:
    :goto_0
then on the next line after "return-object v0"
paste this
Code:
    :cond_3
    new-instance v0, Lcom/android/internal/policy/impl/CyanogenLockScreen;

    iget-object v1, p0, Lcom/android/internal/policy/impl/LockPatternKeyguardView;->mContext:Landroid/content/Context;

    iget-object v2, p0, Lcom/android/internal/policy/impl/LockPatternKeyguardView;->mConfiguration:Landroid/content/res/Configuration;

    iget-object v3, p0, Lcom/android/internal/policy/impl/LockPatternKeyguardView;->mLockPatternUtils:Lcom/android/internal/widget/LockPatternUtils;

    iget-object v4, p0, Lcom/android/internal/policy/impl/LockPatternKeyguardView;->mUpdateMonitor:Lcom/android/internal/policy/impl/KeyguardUpdateMonitor;

    iget-object v5, p0, Lcom/android/internal/policy/impl/LockPatternKeyguardView;->mKeyguardScreenCallback:Lcom/android/internal/policy/impl/KeyguardScreenCallback;

    invoke-direct/range {v0 .. v5}, Lcom/android/internal/policy/impl/CyanogenLockScreen;-><init>(Landroid/content/Context;Landroid/content/res/Configuration;Lcom/android/internal/widget/LockPatternUtils;Lcom/android/internal/policy/impl/KeyguardUpdateMonitor;Lcom/android/internal/policy/impl/KeyguardScreenCallback;)V

    goto :goto_0
Now you may save and close the file.

Now recompile the android.policy.jar and push it to /system/framework with lidroid-res.apk .
Also Push the Lidroid-Parts.apk to '/system/app'

In case If you already have 14 toggles in the status bar adding this may affect it resulting in force closes . So to fix it follow this :

''Proceed below only if you have 14 status bar toggles mod in your ROM''

1.Decompile SystemUI.apk
2.Delete these two folders (if present) : /smali/com/lidroid & /smali/lidroid
3.Download Status_bar_fix from attachments below.
4.Extract it and copy the smali folder to your decompiled SystemUI.apk
5.Recompile and push the SystemUI.apk back to /system/app

Status Bar fix: LINK

NEED ANY ASSISTANCE JUST COMMENT BELOW 
 

Sunday, 8 June 2014

Swap Internal SD card and External SD card of most of the Android™ device


Warning: Please do a complete CWM Backup of your device, so that if anything goes wrong you can revert back to original state. Please don't blame me if you forget to do a complete CWM Backup


Discliamer:I am not responsible if you mess up with your phone, for bricked phones and dead sd cards. Try this on your own risk.

INSTRUCTIONS

Its very simple by modifying the code in vold.fstab file which is present in ext folder of Android's system folder.

This file so called vold.fstab has mounting information for the device to mount the SD cards so change the code to swap the SD cards so that ext_card will be mounted as sdcard and sdcard will be mounted as ext_card.

Note: This will work on any Android phone with internal and external SD cards.

Here is the procedure.....

1. First of all your phone must be ROOTED, If its not then STOP here and get the Root first.

2. Download Root Explorer or any other such explorer which can explore root directory of device.

3. Navigate to system/etc folder mount it as rw(read/write).

4. There you will find vold.fstab file, copy it to your sdcard.

5. Then in your PC open the file in an Text Editor.

6. Find the lines like these,


7. Replace sdcard with ext_card and ext_card with sdcard in these two lines.


8. Again navigate to system/etc change the name of the current vold.fstab file to vold.fstab.old (backup).

9. Paste the new edited vold.fstab file there and long press on it you will get a menu from there change the permissions to "rw_r_ _r_ _" this is important.

10. Reboot the system.

11. If you want to restore changes, delete the edited vold.fstab file and rename the vold.fstab.old file as vold.fstab and reboot.
 

NOTE:

This doesn't seem to work on SAMSUNG devices so please don't try on them. This works on most of the MediaTek devices and few Sony devices. If you were able to successfully swap please mention your device name.Don't forget to read the warning.

This is my copy of vold.fstab.txt as an example....

NEED ANY ASSISTANCE JUST COMMENT BELOW

Dynamic automated build.prop editing

http://cdn-www.xda-developers.com/wp-content/uploads/2014/03/Capture6.png

  1. Backing up /system/build.prop through a script in /system/addon.d
  2. Flashing my own file using a zip after every update
  3. Restoring previous build.prop using a Editor app and reboot
  4. Manually change or add every desired entry and reboot
For most of you one of these ways should absolutely do the trick

So this flashable zip which works as follows:

  • Somewhere on the device is a simple text file in which all those entries are that shall be changed or added to /system/build.prop (In my case it's /sdcard/tweak.prop)
  • After mounting /system and /data (not if they are already) and setting write permissions to /system/build.prop the zip extracts a shell script to /tmp/tweakprop.sh
  • This script scans the text file (aborts if not found) and looks for changed or new entries in /system/build.prop in order to apply them. Changed entries will be overridden, new ones will be added, entries existing in /system/build.prop but not in your personal file will be ignored
  • When tweaking is done, it just removes /tmp/tweakprop.sh and unmounts /system and /data (only if they weren't mounted before) and reverts /system/build.prop's permissions to rw-r--r--
Using this method, you can not only forget about manually updating versions and/or lame reboots after updates for changes to take effect, but also edit your personal text file at any time without beeing root rights required. Once set up to be flashed after every update, your /system/build.prop is always tweaked as you wish and looks like stock one (ROM version, etc. under About Phone).

update-binary
 
PHP Code:
#!/sbin/sh
## /META-INF/com/google/android/update-binary version 0.5 | tweakprop http://forum.xda-developers.com/showthread.php?t=2664332
## credits for ui_print() go to chainfire
OUTFD=$2
ui_print
() {
    echo -
n -e "ui_print $1\n" > /proc/self/fd/$OUTFD
    
echo -n -e "ui_print\n" > /proc/self/fd/$OUTFD}
ui_print ""ui_print "###############################"ui_print "#        tweakprop 0.5        #"ui_print "#      --by klenamenis--      #"ui_print "###############################"ui_print ""
build=/system/build.prop## personal file's name located anywhere on your internal storagename=tweak.prop

ui_print 
"Mount system partition.."mount /system
mount 
-o rw,remount /system
mount 
-o rw,remount /system /system

ui_print 
"Set write permissions for $build.."chmod 0666 $build

ui_print 
"Mount data partition.."mount /data
mount 
-o rw,remount /data
mount 
-o rw,remount /data /data
## search for files called $name and use first occurrenceui_print "searching personal file..."tweak=$(find /sdc* /sto* /ext* -name $name -type f -follow 2>/dev/null | sed 1q)
## abort execution if file is not found or emptytest -s $tweak && ui_print "..$tweak found and not empty" || (ui_print "ERROR: Personal file $name not found or empty, script aborted!s"; exit 0)
## loop trough $tweakui_print ""ui_print "scanning $tweak..."
## read only lines not beginning with #, not being empty, and
## matching any valid entry pattern (someVAR=someVAL), e.g.
## net.bt.name=Android, omni.device=n7100, url.legal=http://www ...
##
## add blank line at end of file to not ignore last line
sed -r '/(#.*|^ *$)/d;/.*=.*/!d;$a' $tweak | while read linedo
    
## get entry from $tweak
    
entry=$(echo $line | sed "s/=.*//")

    
## if variable already present in $build
    
if cat $build | grep -q $entry
    then
        
## override value in $build if different
        
if ! cat $build | grep -q $(cat $tweak | grep $entry)
        
then
            ui_print 
"..value of $entry overridden"
            
sed -i "s/^${entry}=.*$/${line}/g" $build
        fi
        
## I could simply override every existing line in much less code, but this way
        ## your recovery log won't be spamed with non-necessary " value of $entry overridden"

    
else
        
## append entry to $build
        
ui_print "..entry $entry added"
        
echo $line >> $build
    fi
done

ui_print 
"..Tweaks successfully applied!"
ui_print "Restoring original permissions for $build.."chmod 0644 $build

ui_print 
"Unmounting system and data partitions.."umount /system
umount 
/data

ui_print 
"..Script finished!"exit 0 

example.txt
 
Code:
#      ======================================
#     | Dynamic automated build.prop editing |
#    |    by klenamenis               |
#     ======================================
#
# personal file located at /sdcard/0/tweak.prop
#
#
#    for help, please visit official XDA-Thread:
# http://forum.xda-developers.com/showthread.php?p=50683717
#
#
# lines beginning with # will be ignored
# already existing entries will be overridden, new one's added
#
#    for valid/working build.prop configurations, ask google
#
#
# simply add your entries below

ro.sf.lcd_density=240

The zip flashes well on TWRP, CWM and Devil's recovery.

DISCLAIMER: I am not responsible for any damage you cause using my zip! 


Changelog


version 0.1:
  • initial release


version 0.2:
  • ignore lines in personal file not matching a valid entry pattern (someVAR=someVAL) to not mess up /system/build.prop and support personal structuring inside the file like "# media tweaks #", "# dalvik section #", etc.
  • code cleaned up


version 0.2.1:
  • typo fixed in line 24 of tweakprop.sh so the if-statement asks for the correct file (thanks to the_pirate_predator)


version 0.3:
  • changed the while-loop to get it's input directly from sed, which makes a second buffer file obsolete


version 0.3.5:
  • example.txt provided as tweak.prop template
  • ignore lines beginning with # or being empty


version 0.4:
  • instead of a fixed path, the personal file gets searched on internal storage (file name can be set in the script) so you can put your file anywhere - no more problems with /sdcard/ or /sdcard/0/ on different devices
  • personal file must not be empty, otherwise script aborts#
  • only override really different entry values in order to prevent "... value of someVAR overridden" spam in recovery log


version 0.4.5:
  • fixed last line of personal file being ignored due to deleting all empty lines before
  • speed up search for personal file, now looking on internal storage and even on external SD card if nothing was found before (ext. SD neither gets checked if present, nor mounted or unmounted, just trying to search on it silently)


version 0.4.5a:
  • same as 0.4.5a, but personal file is inside the zip and gets extracted to /tmp/tweak.prop, no need to have one on the internal storage


version 0.4.6(a):
  • output not shown in TWRP fixed, now works as it should


version 0.5:

  • code cleanup: everything's now in the update-binary, resulting in much less code and faster execution time
  • output to recovery should now work on all device-recovery combinations


File Type: zip tweakprop-0.1.zip
File Type: zip tweakprop-0.2.zip
File Type: zip tweakprop-0.2.1.zip
File Type: zip tweakprop-0.3.zip
File Type: txt example.txt
File Type: zip tweakprop-0.3.5.zip
File Type: zip tweakprop-0.4.zip
File Type: zip tweakprop-0.4.5.zip
File Type: zip tweakprop-0.4.5a.zip
File Type: zip tweakprop-0.4.6.zip
File Type: zip tweakprop-0.4.6a.zip
File Type: zip tweakprop-0.5.zip

Wednesday, 4 June 2014

"INCREASING INTERNAL MEMORY" of your Android Device

http://androgeek.com/wp-content/uploads/2013/04/low-on-space-420x196.png 

BEFORE STARTING...
  • This guide will partition your sdcard to make a part of your sdcard works like the internal memory that you can move your apps to it.
  • This guide will never increase the real internal memory (Storage in taskmanger) as it is impossible to be done. 

PROCEDURE:

 1-You have to do is to partition your SD Card and for doing this you have to: Download Mini tool Partition.

2- Install the application on your PC and connect your SD card to your PC with Card Reader.

3- Open Mini Tool Partition in your PC and when the wizards open click on your SD Card and select Delete option. !!!(Note: This will format your SD Card completely mean that it will erase your data permanently, so before doing this backup your data at any place in PC or other Storage device.) When the Formatting of your SD Card is completed then, you have whole of space of your SD Card as unallocated

4- then Right click SD Card and select create option. A popup box will open giving you options for making partition; select the partition as primary and file system as FAT if SD Card is less than 4GB or FAT32 if your SD Card is more than 4GB. Leave about 512 MB or more space (your choice) for creating the next partition.

5- Then select done and do right click on unallocated space of your SD Card and again click create option. Select Primary partition but change the file system to Ext2, Ext3 or Ext4. Note: (Ext2 is recommended as most ROMs work fine with it). Click Apply Changes and then process goes on for the few minutes and then partition is completed.

6- Install Link2sd from Google Play
On the first launch of the app, it will ask for root permissions and then, it will ask you the file system of the .ext partition that you had earlier made, choose the option as you had choose in the partitioning steps.

Sort the apps according to size and start linking them and then you have done your task.

Now you have your Phone’s Internal Memory+ Ext file size made by you in your SD Card. Now you can move your apps from your device memory to SD Card and simultaneously your device speed will also be increased.

NEED ANY ASSISTANCE JUST COMMENT BELOW

ADB Data Recovery (recover data from a phone with broken screen)

http://i.stack.imgur.com/Pq6ed.png 

 ADB Data Recovery V1

V1

ADB Data Recovery V2

V1

NEED ANY ASSISTANCE JUST COMMENT BELOW

Unlock Your Android Pattern W/O ROOT & Debugging

http://goideaz.com/wp-content/uploads/2013/12/1.jpg 

REQUIRED FILES:

1.cwm.zip  (you can search for your devices on xda)(ClockworkMod)
 
2.delete_passward.zip : LINK

PROCEDURE:

1.copy both files in root of memory card

2.Insert that memory card in your android device

3.Now switch off your device

4.Now press volume up + power + home button together to start recovery mode

5.In this mode touch will not work so navigate using volume up and down keys and select using home button

6.Now select ‘update zip from sd card’

7.Now select 'cwm.zip'

8.Yellow coloured menu will appear

9.Select ‘install zip from sd card’

10.Then select ‘choose zip from sd card’

11.Select ‘ delete_passward.zip’

12.Now select ‘yes’

13.Then the process will complete after some time

14.Now press back and select ‘Reboot Device’

15.Now Draw Any pattern your device will unlock

16.Now to set new pattern lock use default manner setting-location & security-set new lock

 NEED ANY ASSISTANCE JUST COMMENT BELOW

Terminal Emulator Commands


http://gadgetsdna.com/wp-content/uploads/2010/03/android-adb-shell-500x250.png

The Android Shell
A "shell" is a program that listens to keyboard input from a user and performs actions as directed by the user. Android devices come with a simple shell program. This shell program is mostly undocumented. Since many people are curious about it I thought I'd write up some documentation for it.


Common problems

The built-in shell has very limited error handling. When you type a command name incorrectly it will say "permission denied", even though the real problem is that it couldn't find the command:
Code:
$ dir
dir: permission denied  <---- this is a misleading error message, should say 'dir: not found'
$ ls
... listing of current directory
The PATH variable

The Android shell will run any program it finds in its PATH. The PATH is a list of directories. You can find out what your shell's PATH is set to by using the built-in echo command:

Code:
$ echo $PATH
/data/local/bin:/sbin:/vendor/bin:/system/sbin:/system/bin:/system/xbin
Depending upon your shell, you may see a different result.

Built in Commands

Every shell has a few built-in commands. Some common built-in commands are:

  • echo -- prints text to stdout.
  • set -- sets shell variables
  • export -- makes shell variables available to command-line programs
  • cd -- change the current directory.
  • pwd -- print name of the current directory.

Commands

To find out what commands you have available to you, use the "ls" command on each of the directories in the PATH variable.
Finding documentation for the Android commands.

Many of the Android commands are based on standard Linux (or bsd) commands. If you're curious about a command, you can sometimes learn how it works by using the "man" command on a desktop Linux or OSX (Apple Macintosh) computer. The Linux or OSX version of the command may be different in details, but much of the documentation will still apply to the Android version of the command.

Another source of documentation for people without a Linux or OSX machine handy is to use a web browser and use a web search engine to search for the text: "man Linux command-name".

List of commands
The following is a list of the commands that are present on a Nexus S phone running an Android 2.3.3 "user-debug" build. Many of these commands are not present on a "user" phone. (They are missing from a "user" phone because they are specific to developing or debugging the Android operating system.)

Code:
$ ls /data/local/bin
/data/local/bin: No such file or directory
Notice that by default there is no /data/local/bin directory. You can create this directory using the "mkdir" command if you like.

Code:
$ ls /sbin
opendir failed, Permission denied
The /sbin directory exists, but you don't have permission to access it. You need root access. If you have a developer phone, or otherwise have root access to your phone you can see what's in this directory.

Code:
$ su
# ls /sbin
ueventd
adbd
# exit
$
Notice that the shell prompt changes from a '$' to a '#' to indicate that you have root access.
Notice also that neither of the /sbin commands are useful to the shell -- the adb and ueventd files are 'daemon' programs used to implement the Android Debugger "adb" program that is used by developers.

Code:
$ ls /vendor/bin
gpsd
pvrsrvinit
Vendor/bin is where device vendors can put device-specific executables. These files are from a Nexus S.

Code:
$ ls /system/sbin
/system/sbin: No such file or directory
This directory does not exist on a Nexus S.

Code:
$ ls /system/bin
am
am is the Android Activity Manager. It's used to start and stop Android activities (e.g. applications) from the command line. Type am by itself to get a list of options.
Code:
amix
aplay
Command line audio file player.

Code:
app_process
applypatch
Used to apply patches to android files.

Code:
arec
Command line audio recorder.

Code:
audioloop
bluetoothd
BlueTooth daemon

Code:
bmgr
Backup manager - type command by itself to get documentation.

Code:
bootanimation
Draws the boot animation. You may have to reset your phone to get out of this.

Code:
brcm_patchram_plus
bugreport
cat
Copy the contents of a file to standard output.

Code:
chmod
Change the mode of a file (e.g. whether it can be read or written.)

Code:
chown
Change the owner of a file.

Code:
cmp
Compare two files byte-by-byte

Code:
dalvikvm
The dalvik virtual machine. (Used to run Android applications.)

Code:
date
Prints the current date and time

Code:
dbus-daemon
dd
Convert and copy a file. By default copies standard in to standard out.

Code:
debuggerd
dexopt
df
Shows how much space is free on different file systems on your device.

Code:
dhcpcd
dmesg
dnsmasq
dumpstate
dumpsys
dvz
fsck_msdos
gdbserver
getevent
getprop
gzip
hciattach
hd
id
ifconfig
iftop
ime
input
insmod
installd
ioctl
ionice
iptables
keystore
keystore_cli
kill
Send signals to processes.

Code:
linker
ln
Used to set up a file system link.

Code:
log
logcat
Prints the Android runtime log.

Code:
logwrapper
ls
Lists files.

Code:
lsmod
lsof
make_ext4fs
mediaserver
mkdir
Make a directory.

Code:
monkey
A program that sends random events, used to test applications. (Like having a monkey playing with the device.)

Code:
mount
mtpd
mv
Move a file from one directory to another. (Only on the same file system. Use "cat a > b" to copy a file between file systems.

Code:
nandread
ndc
netcfg
netd
netstat
newfs_msdos
notify
omx_tests
pand
ping
pm
pppd
printenv
ps
List active processes.

Code:
qemu-props
qemud
racoon
radiooptions
reboot
Reboot the device.

Code:
record
renice
rild
rm
Remove a file.

Code:
rmdir
Remove a directory.

Code:
rmmod
route
rtp_test
run-as
schedtest
schedtop
sdcard
sdptool
sendevent
service
servicemanager
setconsole
setprop
setup_fs
sh
showlease
sleep
smd
stagefright
start
Starts the Android runtime.

Code:
stop
Stops the Android runtime.

Code:
surfaceflinger
svc
sync
system_server
tc
testid3
toolbox
top
Shows which processes are currently using the most CPU time.

Code:
umount
uptime
Prints how long your device has been running since it was last booted.

Code:
vdc
vmstat
vold
watchprops
wipe
wpa_cli
wpa_supplicant

$ ls /system/xbin
add-property-tag
btool
check-lost+found
dexdump
dhdutil
hcidump
latencytop
librank
opcontrol
oprofiled
procmem
procrank
rawbu
scp
Secure copy program. (Used to copy files over the network.)

Code:
showmap
showslab
sqlite3
Used to administer SQLite databases.

Code:
strace
System trace command - use to see what system calls a program makes.

Code:
su
Start a shell with root privileges.