Tuesday, 24 June 2014

UI Sound Themer for Android

http://3.bp.blogspot.com/-13v5_Nlfwjk/U52iXr3fNBI/AAAAAAAAASk/dY99UAUbVS8/s1600/icon.png 

Customize your system ui Sounds

UI Sound Themer is a new Application and therefore, a beta version.

Do not use any wired characters on Sound Package Name!

Wrong: My*sound/11.zip

Right: My_sound11.zip

Function:
  • Backup current Ui Sounds
  • Restore current Ui Sounds
  • Play Downloaded Ui Sounds
  • Install Downloaded Ui Sounds
  • Choose Sound Packs from Sd Card
  • Install Sound Packs from Sd Card
  • Install Backup Script
  • Uninstall Sound Packs from system (/data/system/soundpacks/)
  • Mange Sound Packs in folder "Choose" 
  • Manage Sound Packs in folder "SoundPacks" (Installed sound Packs on SD Card) 
  • Rename Sound Packs
  • Delete Sound Packs
Compatibility:

It should work on all rooted devices Stock & Custom Roms!

Changelogs:

Update History (APK):
1.7
BugFix Permission request on some Devices.

1.6
Somo Interface changes:
New File Chooser Design
Menu on right up corner
Side-Bar Menu

New Function:
Uninstall Sound Packs from system (/data/system/soundpacks/)
Mange Sound Packs in folder "Choose" **
Manage Sound Packs in folder "SoundPacks" (Installed sound Packs on SD Card) **
Rename Sound Pakcks
Delete Sound Packs


1.5
Some bugfix on Download screen
Bugfix Open zip files wth a " " space in the Name Like "my sound.zip"

Add Backup Script (restore current soundpack after Rom Update)


add New Sound Packs
Xperia_Z2
Xbox_N_Steam
Windows_7
Wave
TNG
Old_Game
MIUI
Minecraft_Pack
Megaman_Pack
Laser_V
Jelly_Bell
iOS_v1
Boat
Bit_SNES_16
bit_8

1.4
Compatible with Sound Package Creator 1.+ (PC Tool V1.1)

1.3
Bugfix ==> Choose Sound Packs ==> Write direct to System

1.2
Choose external sound packs
install external sound packs direct to system or trough packager chooser (Omni Roms etc)
some small bugfixes

1.1
Added new sounds
Xperia Z1
Pete
Oppo Find 5
Linux Mint
LG G2
Kit Kat
Htc One
Galaxy S4
Final Fantasy

Screenshots


Ui Sound Themer - screenshot Ui Sound Themer - screenshot
 
Downloads

Download APK V1.0 -Mediafire
Download APK V1.1 -Mediafire
Download APK V1.2 -Mediafire
Download APK V1.3 -Mediafire
Download APK V1.4 -Mediafire
Download APK V1.5 -Mediafire
Download APK V1.6 -Mediafire
Download APK V1.7 -Mediafire
Download -Google Play

Download PC Tool V1.2 Beta -Mediafire
Download PC Tool V1.1 -Mediafire
Download PC Tool V1.0 -Mediafire

Instruction Video Package Creator


NEED ANY ASSISTANCE JUST COMMENT BELOW 
 

Around The World - Simple, elegant World Clocks application


Around the world is a simple, elegant world clocks application for Android.

- 578 Time zones to choose from
- Widget
- Colors

Lite version:

http://kaz.dl.sourceforge.net/project/eddy-edifycodeeditor/Eddy.tar.gz

Pro version (no ads):

http://kaz.dl.sourceforge.net/project/eddy-edifycodeeditor/Eddy.tar.gz

MTK Android (Sp flash tool )

What's needed:

  • USB data cable
  • MediaTek USB VCOM drivers
  • SP Flash Tool ( Latest version MTK Flash Tool v. 5.1343.01 (18.10.2013))

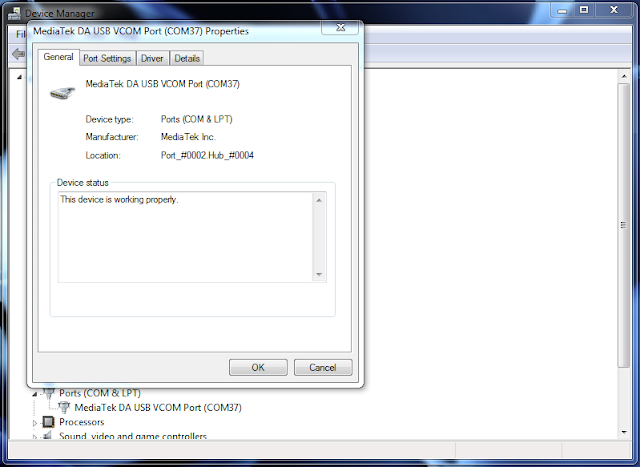
  • First of all, make sure that you have MediaTek DA USB VCOM drivers installed.
Flashing the whole ROM
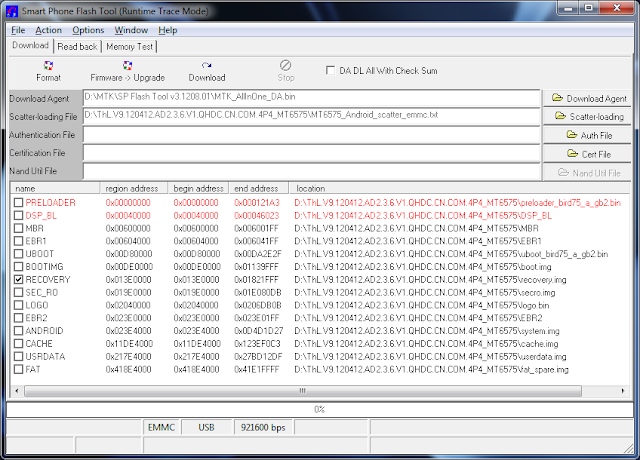
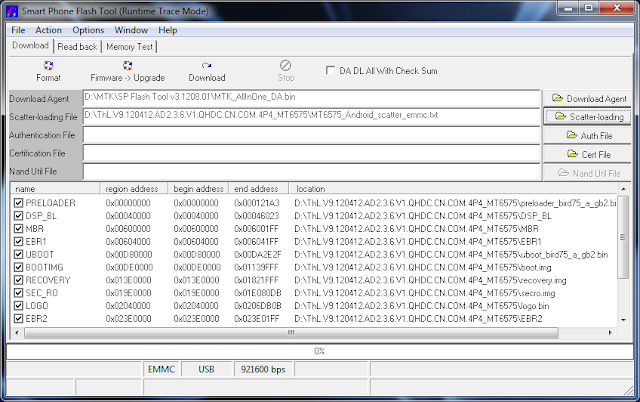
  • First of all open SP Flash Tool, then click Scatter-loading button to load the correct scatter file
    (MT6575_Android_scatter_emmc.txt or MT6577_Android_scatter_emmc.txt, depending on which phone you have) for your device and ignore any message that may appear.

  • Turn off your phone, remove the battery and replace it after some seconds (and don't turn on the phone).
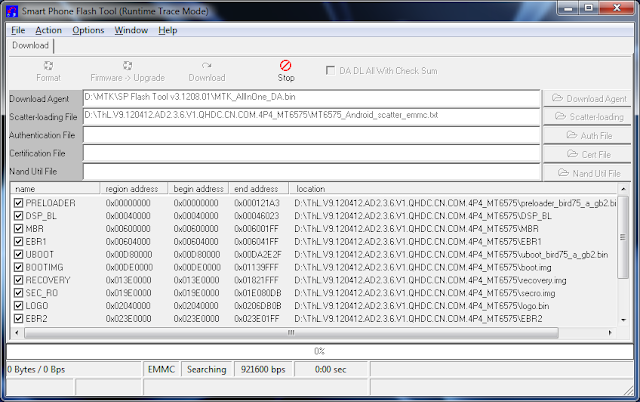
  • Press F9 (or hit Download button) and connect your phone into the computer via USB data cable.
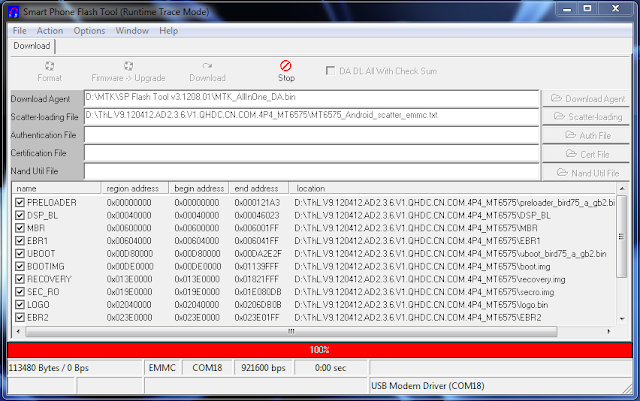
    The process will start and a red progress bar will appear.


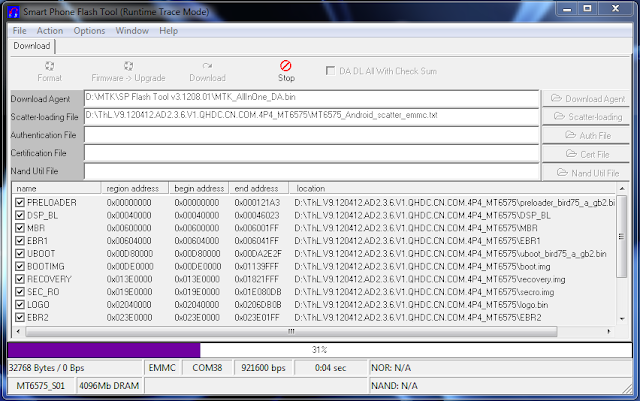
  • After the red progress bar is complete, there will appear a purple progress bar.

  • Right after the purple progress bar is complete, a message will appear underneath it:
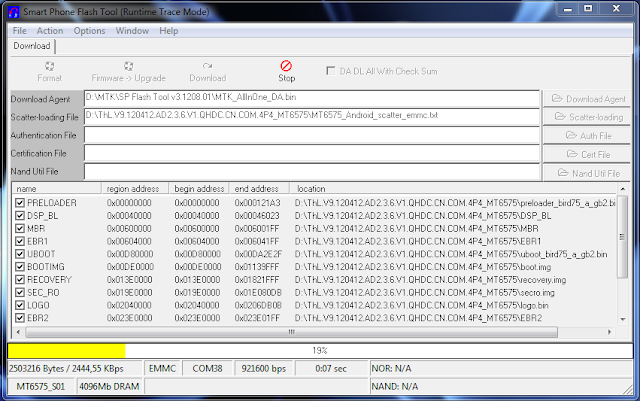
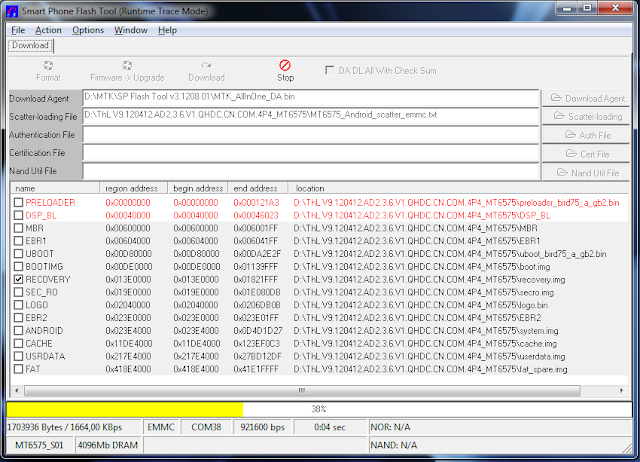
    Please insert USB cable in x seconds” and then the download will start right away (you will see the yellow progress bar filling up).


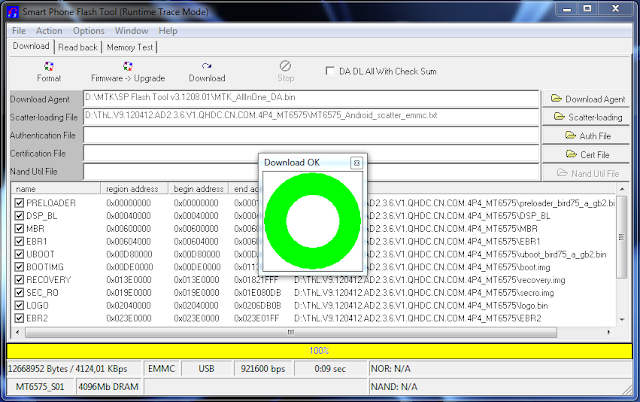
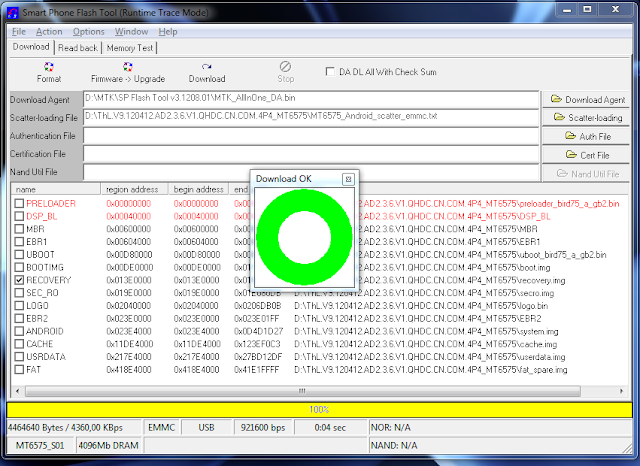
  • When the yellow bar is complete, you'll get a popup with a green circle and Download OK message,
    which means that the process has been successfully terminated.


  • You can now safely disconnect your phone and turn it on. The process ends here.
Flashing only part of the ROM
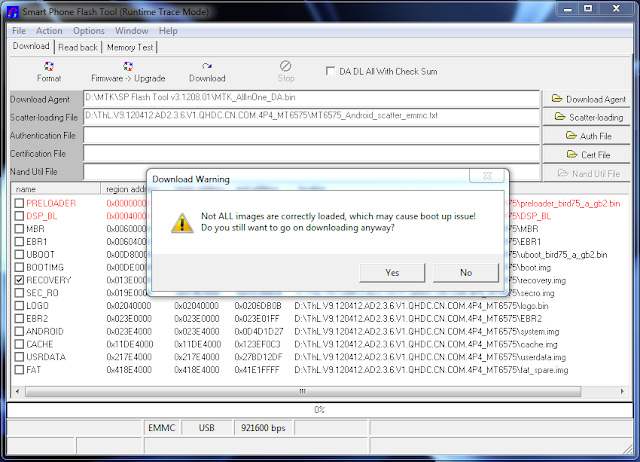
  • In case you want to flash just one part of the ROM, that is also possible. In the shown example, only recovery image will be flashed.
    Deselect all parts except the one(s) you want to flash and then press F9 (or hit Download button).

  • The tool will immediately show a warning because not all parts are selected, but you should continue anyway. Safely press Yes to continue.


  • The download of the chosen partition image will start and after the yellow bar is complete, the popup with the green circle should appear.


  • Please note that, even though it isn't mandatory to select it on the list of images to flash,
    preloader file must be present in the same folder as the other partition(s) that you want to flash, or else phone will not be able to enter into download mode.

Attention: Please follow the instructions carefully. I will not take any responsibility on whatever may happen with your phone.

Very important warning: Always make sure that you trust the sources of the ROM you download and know that it is meant for your phone.
After flashing a wrong preloader, your phone will be completely dead (can't be powered on, it will not charge and won't be detected anymore by the computer) and there is no way to recover it.
==========================================================================
[Tool]SP FlashTool ||MTK Android FLASHER: LINK ==========================================================================
Mediatek - Flash Tool - Info page
Mediatek - Flash Tool - Downlaod page

SP Flash Tool v. 3.1224.0212 (01.11.2013)

MTK Flash Tool v. 5.1320.00 (23.05.2013)
MTK Flash Tool v. 5.1343.01 (18.10.2013)


SP Flash Tool are for SmartPhone products
MT6573\72 Innovative Platform for Mainstream Smartphones
MT6575 Dual-SIM smartphone platform for the mainstream market
MT6577 1 GHz Dual-Core Smartphone Platform
MT6582 Quad-Core Cortex-A7 1.2GHz+CPU Smartphone Platform
MT6589 Quad-Core Cortex-A7 1GHz+CPU Smartphone Platform

MTK Flash Tool is for Feature Phone chips
MT6223 GSM/GPRS solution for ULC/ULC+ market
MT6235 GSM/GPRS/EDGE solution for Mainstream Multimedia
MT6236 GSM/GPRS/EDGE Feature- rich Multimedia solution
MT6238 GSM/GPRS/EDGE Premium Multimedia solution
MT6239 GSM/GPRS/EDGE Premium Multimedia solution
MT6250 Single- Chip GSM/GPRS/EDGE- RX entry- multimedia solution
MT6252 GSM/GPRS/EGPRS entry- multimedia single chip solution
MT6253 Single- Chip GSM/GPRS entry- multimedia solution
MT6255 Single- Chip GSM/GPRS/EDGE- RX Smart Feature Phone solution
MT6268 High- end EDGE/GPRS/WCDMA Feature Rich Multimedia Phone Solution
MT6276M HSPA Data Modem Solution
MT6516 EDGE/GPRS Feature Rich Multimedia Smart Phone Entry Solution

MTK Flash tool v. 5.x fix a critical bug about SP Flash Tool 3.x where the SP Flashtool reads iincorrectly the scatter file of some new mobile based on MTK6582 (error: recovery partition is not flashable).

 NEED ANY ASSISTANCE JUST COMMENT BELOW 
 

Add 6 lockscreens Mod + Lockscreen Gestures on Android

http://i.kinja-img.com/gawker-media/image/upload/s--vYuWMvSY--/c_fit,fl_progressive,q_80,w_636/1866lt2cih2n1png.png

 Files To be downloaded :

1. android.policy.zip
2. Lidroid-res.apk
3. Lidroid-Parts


Files to be Affected :

1. android.policy.jar
2. systemui.apk (only if you have added 14 status bar toggles before)


Steps :

-Pullout android.policy.jar from '/system/framework' (Must be Deodexed)
-Decompile it (Please dont expect a guide on how to decompile)
-Extract the android.policy.zip file
-copy the smali folder to directory where you decompiled your android.policy.jar

-Now open this file android.policy.jar.out\smali\com\android\internal\ policy\impl\KeyguardUpdateMonitor.smali and make the following changes :

-At the begining after '#annonations' search for this line "Lcom/android/internal/policy/impl/KeyguardUpdateMonitor$AirplaneModeChangeCallback;"

after that add this line

Code:
Lcom/android/internal/policy/impl/KeyguardUpdateMonitor$MediaStateCallback;,

-Now find this line ".field private mLockscreenWallpaperDrawable:Landroid/graphics/drawable/Drawable;"

-Below it paste this line
Code:
.field private mMediaCallbacks:Ljava/util/ArrayList;
    .annotation system Ldalvik/annotation/Signature;
        value = {
            "Ljava/util/ArrayList",
            "<",
            "Lcom/android/internal/policy/impl/KeyguardUpdateMonitor$MediaStateCallback;",
            ">;"
        }
    .end annotation
.end field
-Find this line ".field private mWallpaperModeValue:I"

and jus below paste this

Code:
.field private timezone:Ljava/lang/String;
-Now find this method ".method private handleSimStateChange(Lcom/android/internal/policy/impl/KeyguardUpdateMonitor$SimArgs"

and above it paste this :

Code:
.method private handleMediaUpdate(IILandroid/net/Uri;)V
    .locals 5
    .parameter "isPlaying"
    .parameter "isStop"
    .parameter "mediaUri"

    .prologue
    const/4 v4, 0x0

    const/4 v3, 0x1

    .line 467
    if-ne p1, v3, :cond_0

    move v0, v3

    .line 468
    .local v0, bIsPlaying:Z
    :goto_0
    if-ne p2, v3, :cond_1

    move v1, v3

    .line 470
    .local v1, bIsStop:Z
    :goto_1
    const/4 v2, 0x0

    .local v2, i:I
    :goto_2
    iget-object v3, p0, Lcom/android/internal/policy/impl/KeyguardUpdateMonitor;->mMediaCallbacks:Ljava/util/ArrayList;

    invoke-virtual {v3}, Ljava/util/ArrayList;->size()I

    move-result v3

    if-ge v2, v3, :cond_2

    .line 471
    iget-object v3, p0, Lcom/android/internal/policy/impl/KeyguardUpdateMonitor;->mMediaCallbacks:Ljava/util/ArrayList;

    invoke-virtual {v3, v2}, Ljava/util/ArrayList;->get(I)Ljava/lang/Object;

    move-result-object v3

    check-cast v3, Lcom/android/internal/policy/impl/KeyguardUpdateMonitor$MediaStateCallback;

    invoke-interface {v3, v0, v1, p3}, Lcom/android/internal/policy/impl/KeyguardUpdateMonitor$MediaStateCallback;->onMediaUpdated(ZZLandroid/net/Uri;)V

    .line 470
    add-int/lit8 v2, v2, 0x1

    goto :goto_2

    .end local v0           #bIsPlaying:Z
    .end local v1           #bIsStop:Z
    .end local v2           #i:I
    :cond_0
    move v0, v4

    .line 467
    goto :goto_0

    .restart local v0       #bIsPlaying:Z
    :cond_1
    move v1, v4

    .line 468
    goto :goto_1

    .line 473
    .restart local v1       #bIsStop:Z
    .restart local v2       #i:I
    :cond_2
    return-void
.end method

-Now find this line ".method public getFailedAttempts()I"

above it again paste this :
Code:
.method public getChangedTimeZone()Ljava/lang/String;
    .locals 1

    .prologue
    .line 1131
    iget-object v0, p0, Lcom/android/internal/policy/impl/KeyguardUpdateMonitor;->timezone:Ljava/lang/String;

    return-object v0
.end method

this one's last for this file, search for ".method public isDevicePluggedIn()Z"

and above it paste :

Code:
.method public isDeviceCharged()Z
    .locals 2

    .prologue
    .line 866
    iget v0, p0, Lcom/android/internal/policy/impl/KeyguardUpdateMonitor;->mBatteryLevel:I

    const/16 v1, 0x64

    if-lt v0, v1, :cond_0

    const/4 v0, 0x1

    :goto_0
    return v0

    :cond_0
    const/4 v0, 0x0

    goto :goto_0
.end method
-Now close this file and open "\smali\com\android\internal\policy\impl\LockPatte rnKeyguardView"

-Search for this method now ".method createLockScreen()Landroid/view/View;"
Find this (Jus one line below)
Code:
    .prologue
    .line 868
below it paste this :

Code:
    const/4 v2, 0x0

    const/4 v0, 0x0

    iget-object v3, p0, Lcom/android/internal/policy/impl/LockPatternKeyguardView;->mContext:Landroid/content/Context;

    invoke-virtual {v3}, Landroid/content/Context;->getContentResolver()Landroid/content/ContentResolver;

    move-result-object v3

    const-string v4, "lockscreen_style_pref"

    invoke-static {v3, v4, v2}, Landroid/provider/Settings$System;->getInt(Landroid/content/ContentResolver;Ljava/lang/String;I)I

    move-result v0

    const/4 v2, 0x1

    if-eq v2, v0, :cond_3

    const/4 v2, 0x2

    if-eq v2, v0, :cond_3

    const/4 v2, 0x3

    if-eq v2, v0, :cond_3

    const/4 v2, 0x4

    if-eq v2, v0, :cond_3

    const/4 v2, 0x5

    if-eq v2, v0, :cond_3

    if-eqz v0, :cond_0

    .line 869
    const/4 v2, 0x0

    const/4 v0, 0x0

    iget-object v3, p0, Lcom/android/internal/policy/impl/LockPatternKeyguardView;->mContext:Landroid/content/Context;

    invoke-virtual {v3}, Landroid/content/Context;->getContentResolver()Landroid/content/ContentResolver;

    move-result-object v3

    const-string v4, "lockscreen_style_pref"

    invoke-static {v3, v4, v2}, Landroid/provider/Settings$System;->getInt(Landroid/content/ContentResolver;Ljava/lang/String;I)I

    move-result v0

    const/4 v2, 0x6

    if-eq v2, v0, :cond_2

    const/4 v2, 0x7

    if-eq v2, v0, :cond_1

    :cond_0
    new-instance v0, Lcom/android/internal/policy/impl/LockScreen;

    iget-object v1, p0, Lcom/android/internal/policy/impl/LockPatternKeyguardView;->mContext:Landroid/content/Context;

    iget-object v2, p0, Lcom/android/internal/policy/impl/LockPatternKeyguardView;->mConfiguration:Landroid/content/res/Configuration;

    iget-object v3, p0, Lcom/android/internal/policy/impl/LockPatternKeyguardView;->mLockPatternUtils:Lcom/android/internal/widget/LockPatternUtils;

    iget-object v4, p0, Lcom/android/internal/policy/impl/LockPatternKeyguardView;->mUpdateMonitor:Lcom/android/internal/policy/impl/KeyguardUpdateMonitor;

    iget-object v5, p0, Lcom/android/internal/policy/impl/LockPatternKeyguardView;->mKeyguardScreenCallback:Lcom/android/internal/policy/impl/KeyguardScreenCallback;

    invoke-direct/range {v0 .. v5}, Lcom/android/internal/policy/impl/LockScreen;-><init>(Landroid/content/Context;Landroid/content/res/Configuration;Lcom/android/internal/widget/LockPatternUtils;Lcom/android/internal/policy/impl/KeyguardUpdateMonitor;Lcom/android/internal/policy/impl/KeyguardScreenCallback;)V

    goto :goto_0

    :cond_1
    new-instance v0, Lcom/android/internal/policy/impl/LockScreen;

    iget-object v1, p0, Lcom/android/internal/policy/impl/LockPatternKeyguardView;->mContext:Landroid/content/Context;

    iget-object v2, p0, Lcom/android/internal/policy/impl/LockPatternKeyguardView;->mConfiguration:Landroid/content/res/Configuration;

    iget-object v3, p0, Lcom/android/internal/policy/impl/LockPatternKeyguardView;->mLockPatternUtils:Lcom/android/internal/widget/LockPatternUtils;

    iget-object v4, p0, Lcom/android/internal/policy/impl/LockPatternKeyguardView;->mUpdateMonitor:Lcom/android/internal/policy/impl/KeyguardUpdateMonitor;

    iget-object v5, p0, Lcom/android/internal/policy/impl/LockPatternKeyguardView;->mKeyguardScreenCallback:Lcom/android/internal/policy/impl/KeyguardScreenCallback;

    invoke-direct/range {v0 .. v5}, Lcom/android/internal/policy/impl/LockScreen;-><init>(Landroid/content/Context;Landroid/content/res/Configuration;Lcom/android/internal/widget/LockPatternUtils;Lcom/android/internal/policy/impl/KeyguardUpdateMonitor;Lcom/android/internal/policy/impl/KeyguardScreenCallback;)V

    goto :goto_0

    :cond_2
after ':cond_2' there will be your default lockscreen so dont leave any line between them.

After the end of your default lockscreen , it might be like this
" invoke-direct/range {v0 .. v5}, Lcom/android/internal/policy/impl/CircleLockScreen;-><init>(Landroid/content/Context;Landroid/content/res/Configuration;Lcom/android/internal/widget/LockPatternUtils;Lcom/android/internal/policy/impl/KeyguardUpdateMonitor;Lcom/android/internal/policy/impl/KeyguardScreenCallback
"
paste this
Code:
    :goto_0
then on the next line after "return-object v0"
paste this
Code:
    :cond_3
    new-instance v0, Lcom/android/internal/policy/impl/CyanogenLockScreen;

    iget-object v1, p0, Lcom/android/internal/policy/impl/LockPatternKeyguardView;->mContext:Landroid/content/Context;

    iget-object v2, p0, Lcom/android/internal/policy/impl/LockPatternKeyguardView;->mConfiguration:Landroid/content/res/Configuration;

    iget-object v3, p0, Lcom/android/internal/policy/impl/LockPatternKeyguardView;->mLockPatternUtils:Lcom/android/internal/widget/LockPatternUtils;

    iget-object v4, p0, Lcom/android/internal/policy/impl/LockPatternKeyguardView;->mUpdateMonitor:Lcom/android/internal/policy/impl/KeyguardUpdateMonitor;

    iget-object v5, p0, Lcom/android/internal/policy/impl/LockPatternKeyguardView;->mKeyguardScreenCallback:Lcom/android/internal/policy/impl/KeyguardScreenCallback;

    invoke-direct/range {v0 .. v5}, Lcom/android/internal/policy/impl/CyanogenLockScreen;-><init>(Landroid/content/Context;Landroid/content/res/Configuration;Lcom/android/internal/widget/LockPatternUtils;Lcom/android/internal/policy/impl/KeyguardUpdateMonitor;Lcom/android/internal/policy/impl/KeyguardScreenCallback;)V

    goto :goto_0
Now you may save and close the file.

Now recompile the android.policy.jar and push it to /system/framework with lidroid-res.apk .
Also Push the Lidroid-Parts.apk to '/system/app'

In case If you already have 14 toggles in the status bar adding this may affect it resulting in force closes . So to fix it follow this :

''Proceed below only if you have 14 status bar toggles mod in your ROM''

1.Decompile SystemUI.apk
2.Delete these two folders (if present) : /smali/com/lidroid & /smali/lidroid
3.Download Status_bar_fix from attachments below.
4.Extract it and copy the smali folder to your decompiled SystemUI.apk
5.Recompile and push the SystemUI.apk back to /system/app

Status Bar fix: LINK

NEED ANY ASSISTANCE JUST COMMENT BELOW 
 

Thursday, 12 June 2014

Mirror for chromecast - mirror4cast is released

Mirror for chromecast - screenshot

DESCRIPTION


Mirror4cast could mirror the screen of any android device to your chromecast.

Note:

  • Your android device MUST be rooted;
  • There is no audio for mirroring;
  • There is about 0.5 second delay for screen mirroring;
Features:
  • Mirror the screen of any android device to chromecast;
  • Rotate automatically;
Usage of mirror4cast:
  • You could see picture, PDF, document, etc, on TV;
  • You could see screen of game on TV;
  • You could see video chat on TV;
User guide for mirror4cast:

https://code.google.com/p/mirror4cast/
If you want cast video/audio, not mirroring, you could try y2cast.
Keyword: mirror, chromecast, googlecast, mirror4cast

CHANGELOGS

1.04

refine for 4.4.x

1.03
fix issue of "no mirroring on chromecast randomly" when press mirror button;

1.02
fix issue of "mirror service" for 4.2+ android devices;

Supported android devices:
4.4.x
4.3.x
4.2.x (e.g.: Nexus 7)
4.1.x and less

SCREENSHOTS

Mirror for chromecast - screenshot

Mirror for chromecast - screenshot


Demo video's

youtube:

http://saltsorganic.com/wp-content/uploads/2014/04/watch-button-jpg.jpg

youku:

http://saltsorganic.com/wp-content/uploads/2014/04/watch-button-jpg.jpg

video from user

http://saltsorganic.com/wp-content/uploads/2014/04/watch-button-jpg.jpg


Download:

google play store:

http://kaz.dl.sourceforge.net/project/eddy-edifycodeeditor/Eddy.tar.gz

Free trial:

http://kaz.dl.sourceforge.net/project/eddy-edifycodeeditor/Eddy.tar.gz
(if you purchase mirror4cast, please uninstall free trial, and reboot device, then run mirror4cast.)


NEED ANY ASSISTANCE JUST COMMENT BELOW
Sunday, 8 June 2014

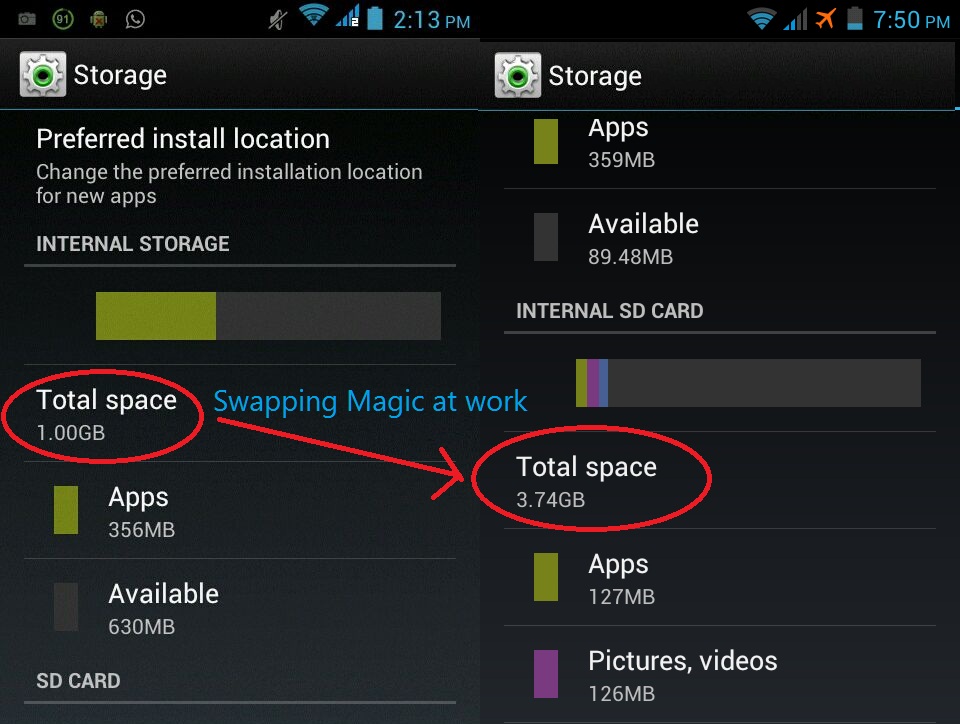
Swap Internal SD card and External SD card of most of the Android™ device


Warning: Please do a complete CWM Backup of your device, so that if anything goes wrong you can revert back to original state. Please don't blame me if you forget to do a complete CWM Backup


Discliamer:I am not responsible if you mess up with your phone, for bricked phones and dead sd cards. Try this on your own risk.

INSTRUCTIONS

Its very simple by modifying the code in vold.fstab file which is present in ext folder of Android's system folder.

This file so called vold.fstab has mounting information for the device to mount the SD cards so change the code to swap the SD cards so that ext_card will be mounted as sdcard and sdcard will be mounted as ext_card.

Note: This will work on any Android phone with internal and external SD cards.

Here is the procedure.....

1. First of all your phone must be ROOTED, If its not then STOP here and get the Root first.

2. Download Root Explorer or any other such explorer which can explore root directory of device.

3. Navigate to system/etc folder mount it as rw(read/write).

4. There you will find vold.fstab file, copy it to your sdcard.

5. Then in your PC open the file in an Text Editor.

6. Find the lines like these,


7. Replace sdcard with ext_card and ext_card with sdcard in these two lines.


8. Again navigate to system/etc change the name of the current vold.fstab file to vold.fstab.old (backup).

9. Paste the new edited vold.fstab file there and long press on it you will get a menu from there change the permissions to "rw_r_ _r_ _" this is important.

10. Reboot the system.

11. If you want to restore changes, delete the edited vold.fstab file and rename the vold.fstab.old file as vold.fstab and reboot.
 

NOTE:

This doesn't seem to work on SAMSUNG devices so please don't try on them. This works on most of the MediaTek devices and few Sony devices. If you were able to successfully swap please mention your device name.Don't forget to read the warning.

This is my copy of vold.fstab.txt as an example....

NEED ANY ASSISTANCE JUST COMMENT BELOW
Dynamic automated build.prop editing

http://cdn-www.xda-developers.com/wp-content/uploads/2014/03/Capture6.png

  1. Backing up /system/build.prop through a script in /system/addon.d
  2. Flashing my own file using a zip after every update
  3. Restoring previous build.prop using a Editor app and reboot
  4. Manually change or add every desired entry and reboot
For most of you one of these ways should absolutely do the trick

So this flashable zip which works as follows:

  • Somewhere on the device is a simple text file in which all those entries are that shall be changed or added to /system/build.prop (In my case it's /sdcard/tweak.prop)
  • After mounting /system and /data (not if they are already) and setting write permissions to /system/build.prop the zip extracts a shell script to /tmp/tweakprop.sh
  • This script scans the text file (aborts if not found) and looks for changed or new entries in /system/build.prop in order to apply them. Changed entries will be overridden, new ones will be added, entries existing in /system/build.prop but not in your personal file will be ignored
  • When tweaking is done, it just removes /tmp/tweakprop.sh and unmounts /system and /data (only if they weren't mounted before) and reverts /system/build.prop's permissions to rw-r--r--
Using this method, you can not only forget about manually updating versions and/or lame reboots after updates for changes to take effect, but also edit your personal text file at any time without beeing root rights required. Once set up to be flashed after every update, your /system/build.prop is always tweaked as you wish and looks like stock one (ROM version, etc. under About Phone).

update-binary
 
PHP Code:
#!/sbin/sh
## /META-INF/com/google/android/update-binary version 0.5 | tweakprop http://forum.xda-developers.com/showthread.php?t=2664332
## credits for ui_print() go to chainfire
OUTFD=$2
ui_print
() {
    echo -
-"ui_print $1\n" > /proc/self/fd/$OUTFD
    
echo --"ui_print\n" > /proc/self/fd/$OUTFD}
ui_print ""ui_print "###############################"ui_print "#        tweakprop 0.5        #"ui_print "#      --by klenamenis--      #"ui_print "###############################"ui_print ""
build=/system/build.prop## personal file's name located anywhere on your internal storagename=tweak.prop

ui_print 
"Mount system partition.."mount /system
mount 
-o rw,remount /system
mount 
-o rw,remount /system /system

ui_print 
"Set write permissions for $build.."chmod 0666 $build

ui_print 
"Mount data partition.."mount /data
mount 
-o rw,remount /data
mount 
-o rw,remount /data /data
## search for files called $name and use first occurrenceui_print "searching personal file..."tweak=$(find /sdc* /sto* /ext* -name $name -type f -follow 2>/dev/null sed 1q)
## abort execution if file is not found or emptytest -s $tweak && ui_print "..$tweak found and not empty" || (ui_print "ERROR: Personal file $name not found or empty, script aborted!s"; exit 0)
## loop trough $tweakui_print ""ui_print "scanning $tweak..."
## read only lines not beginning with #, not being empty, and
## matching any valid entry pattern (someVAR=someVAL), e.g.
## net.bt.name=Android, omni.device=n7100, url.legal=http://www ...
##
## add blank line at end of file to not ignore last line
sed -'/(#.*|^ *$)/d;/.*=.*/!d;$a' $tweak | while read linedo
    
## get entry from $tweak
    
entry=$(echo $line sed "s/=.*//")

    
## if variable already present in $build
    
if cat $build grep -q $entry
    then
        
## override value in $build if different
        
if ! cat $build grep -$(cat $tweak grep $entry)
        
then
            ui_print 
"..value of $entry overridden"
            
sed -"s/^${entry}=.*$/${line}/g" $build
        fi
        
## I could simply override every existing line in much less code, but this way
        ## your recovery log won't be spamed with non-necessary " value of $entry overridden"

    
else
        
## append entry to $build
        
ui_print "..entry $entry added"
        
echo $line >> $build
    fi
done

ui_print 
"..Tweaks successfully applied!"
ui_print "Restoring original permissions for $build.."chmod 0644 $build

ui_print 
"Unmounting system and data partitions.."umount /system
umount 
/data

ui_print 
"..Script finished!"exit 

example.txt
 
Code:
#      ======================================
#     | Dynamic automated build.prop editing |
#    |    by klenamenis               |
#     ======================================
#
# personal file located at /sdcard/0/tweak.prop
#
#
#    for help, please visit official XDA-Thread:
# http://forum.xda-developers.com/showthread.php?p=50683717
#
#
# lines beginning with # will be ignored
# already existing entries will be overridden, new one's added
#
#    for valid/working build.prop configurations, ask google
#
#
# simply add your entries below

ro.sf.lcd_density=240

The zip flashes well on TWRP, CWM and Devil's recovery.

DISCLAIMER: I am not responsible for any damage you cause using my zip! 


Changelog


version 0.1:
  • initial release


version 0.2:
  • ignore lines in personal file not matching a valid entry pattern (someVAR=someVAL) to not mess up /system/build.prop and support personal structuring inside the file like "# media tweaks #", "# dalvik section #", etc.
  • code cleaned up


version 0.2.1:
  • typo fixed in line 24 of tweakprop.sh so the if-statement asks for the correct file (thanks to the_pirate_predator)


version 0.3:
  • changed the while-loop to get it's input directly from sed, which makes a second buffer file obsolete


version 0.3.5:
  • example.txt provided as tweak.prop template
  • ignore lines beginning with # or being empty


version 0.4:
  • instead of a fixed path, the personal file gets searched on internal storage (file name can be set in the script) so you can put your file anywhere - no more problems with /sdcard/ or /sdcard/0/ on different devices
  • personal file must not be empty, otherwise script aborts#
  • only override really different entry values in order to prevent "... value of someVAR overridden" spam in recovery log


version 0.4.5:
  • fixed last line of personal file being ignored due to deleting all empty lines before
  • speed up search for personal file, now looking on internal storage and even on external SD card if nothing was found before (ext. SD neither gets checked if present, nor mounted or unmounted, just trying to search on it silently)


version 0.4.5a:
  • same as 0.4.5a, but personal file is inside the zip and gets extracted to /tmp/tweak.prop, no need to have one on the internal storage


version 0.4.6(a):
  • output not shown in TWRP fixed, now works as it should


version 0.5:

  • code cleanup: everything's now in the update-binary, resulting in much less code and faster execution time
  • output to recovery should now work on all device-recovery combinations


File Type: zip tweakprop-0.1.zip
File Type: zip tweakprop-0.2.zip
File Type: zip tweakprop-0.2.1.zip
File Type: zip tweakprop-0.3.zip
File Type: txt example.txt
File Type: zip tweakprop-0.3.5.zip
File Type: zip tweakprop-0.4.zip
File Type: zip tweakprop-0.4.5.zip
File Type: zip tweakprop-0.4.5a.zip
File Type: zip tweakprop-0.4.6.zip
File Type: zip tweakprop-0.4.6a.zip
File Type: zip tweakprop-0.5.zip

Saturday, 7 June 2014

Easy Magic PhilZ Touch Installer for MediaTek Devices

http://i0.wp.com/www.theandroidsoul.com/wp-content/uploads/2014/02/PhilZ-Touch-Recovery.jpg
DESCRIPTION

It is based on Koush clockworkmod 6.x to which I added many features and a full reliable touch interface
It brings a true touch and scroll interface, fully customizable GUI, theme support, advanced nandroid options and much more


How to select your .android_secure path
  • In Custom Backup and Restore operations, you can select the target/source for android.secure or disable it
  • In stock backup/restore operations, include those started with ROM Manager, you can also force a target/source for .android_secure
  • basically, recovery will check first external storage for a .android_secure folder. If it doesn't find it, it will look in internal storage
  • If you want for example .android_secure to be in internal sd, just delete .android_secure folder from external sd and ensure there is a .android_secure folder in internal sd
  • for external sd, just ensure there is a .android_secure folder in it. It will be chosen what ever is the internal sd state


Custom Backup and Restore menu
  • This is one of the most powerful features of this recovery.
    It is made completely open source code, built from sratch. Just keep credits headers and give proper credit if you use them
  • You can select which partitions you want to backup or restore
  • You can choose your .android_secure source and target or even disable it
  • You can set it to reboot directly after job is done
  • backups will go under the folder clockworkmod/backup (please move all contents of custom_backup folder used in previous versions to the default backup folder in cwm)
  • TWRP backups go under stock TWRP/BACKUPS/device_id folder and will be automatically recognized by TWRP
  • Custom Restore Menu allows you to restore from any of the stock clockworkmod backups, the custom backups or the TWRP backups
  • efs is backed up under clockworkmod/backup/.efs_backup
    - efs must be selected alone for backup in cwm mode
    - it will create 2 copies: a tar and raw img backup using cat/dd command
    - to restore efs, under Custom Restore menu, select efs only and toggle between tar and .img
    - restore .img format is advised, but tar will work under most circumstances
  • modem.bin files can be named any_thing.bin and must go under clockworkmod/backup/.modem_bin
    - with that, you can flash modem.bin files that come with official firmware (may need unlocked devices for some models)
  • if you disable md5, your backups will no more be recognized by stock cwm builds. Look at next step to regenerate md5 for stock cwm compatibility. Otherwise, all stock and custom backups are backward compatible with stock cwm (except special partitions like preload, recovery, modem and efs which stock cwm doesn't support)
  • you can now recreate md5 sum for any backup you want. Use with caution!
  • temporary SElinux context backup and restore:
    users of stock 4.3 Samsung ROMs with restrictive SElinux context, can now enable backup and restore these: under Misc Nandroid Settings, enable the SElinux context option
    - once busybox tar is fixed under CyanogenMod repo, this workaround will no longer be needed and menu will be disabled


Open Recovery Script Support (ORS): revised and adapted from original sk8erwitskil source
  • On start, recovery looks automatically for "/cache/recovery/openrecoveryscript" installed by goomanager or any tasker. If it finds it, it is run and phone will reboot
  • You can also add custom ors scripts you edit your self:
    When pressing the ors menu, it will look at default locations for your custom scripts:
    "clockworkmod/ors" first in extra storage, then in internal sd. Put your custom scripts there with file extension .ors
    That way you can access your jobs (flash, wipe, backup, restore...) instantly
    If no scripts are found in default folder, you get option to browse both storage volumes for a custom location
  • To learn how to write ors scripts to automate your backup/restore/wipe/flash tasks, read here, it is very easy: http://wiki.rootzwiki.com/OpenRecoveryScript
  • Give Goomanager a try
  • All backup and restore options are supported include special partitions 1, 2 and 3 and even extra 4 and 5 partitions (could add modem, efs and preload linked to them later)
  • /preload will be included with /system if you enabled the /preload option in Misc Nandroid Settings
  • you have an extra here: you can set the target volume for ors backups under Misc Nandroid Settings menu
  • ors backups can be set to either TWRP or CWM format


Aroma File Manager Support *Adapted from amarullz and sk8erwitskil
You get here the possibility to browse your phone with root access in a friendly GUI file browser, while being in recovery
You even now get a terminal emulator to run in recovery
  • Download Aroma File Manager from its Home Page
  • Get the last version and rename the file aromafm.zip
  • Put the aromafm.zip in "clockworkmod/aromafm/aromafm.zip" in any of the storage volumes
  • In recovery, tap the Aroma File Manager menu or double tap any part of the screen outside menus
  • It will launch the file manager automatically
  • Double tap gesture linked to Aroma File Manager can be altered in the GUI Settings menu


Touch GUI Preferences:
This is another unique feature of this recovery and is built from scratch
  • You can toggle through 4 touch modes:
    Full Touch: menus are validated by touching them. I added extra checks to make it robust to validation by error while scrolling.
    Double Tap: menus are highlighted on first touch. To validate action, you need to double tap the same menu
    Semi Touch: the classic semi-touch interface I enhanced. Menus are selected/highlighted on first touch. You can scroll by swiping up/down, but no validation on touch.
    Disable Touch: touch code completely disabled. You have all gui options left, but only hardware keys
  • When Full Touch mode is selected, it will automatically set recommended menu height, touch accuracy and scroll sensitivity. You can alter them later if you want
  • Scroll sensitivity controls scrolling on swipe up/down. Lower values are the most sensitive. Adjust this based on selected menu height
  • Touch accuracy: increase it if your touch gestures are not well accounted for
  • Config files are saved in /data/philz-touch/philz-touch_x.ini file.
  • You can do a backup of your settings file, it will go under /sdcard/clockworkmod/philz-touch.ini.bak
  • You can choose to be prompted to restore your settings whenever they are wiped while you have a backup. You can also set recovery to auto-restore them when needed. This check is done when you reboot to main system from within recovery
  • There are many gesture actions that you can setup at your wish (some default actions are setup by default)
  • Long press/move is the bad equivalent to a long press gesture action: just that after 0.6 sec of touch, slightly move your finger or change the pressure surface without actually lifting it
  • Your screen should auto-dim automatically after one minute and turn off after 3 mn. You can change those time settings. Just touch the screen to reset brightness and turn it on (some devices need to press hardware button)
  • All GUI parts can be customized: menu hight, text colors, menu colors, selection colors, background color and icon, menu seprators, battery and clock, header text...
  • To setup a custom background image: put a png image with your device resolution in a folder clockworkmod/custom_res
  • You can take screen shots from recovery display by the slide left gesture (change it at your wish). Pics captures will go under clockworkmod/screen_shots folder. External storage will be always used first. If no external storage is found, internal storage is used. You can take up to 999 pics before it resets to 1


Setup Free Browse Mode and Multi-zip Installer:

Free Browse Mode:
  • You can setup a default folder from where the Install Zip menu will start
  • From within your set default folder, you can now browse backward up to the root file system to install a zip file
Multi-zip Installer menu:
  • Lets you select multiple zip files to flash at the same time
  • The zip files must go into a subfolder under: "clockworkmod/multi_flash"
  • At least one subfolder with your zip files must be created. You can create as many subfolders as you want
  • exp: clockworkmod/multi_flash/NEAT_ROM_files


Pause on Logs:
  • Pause on Logs: when enabled, after flashing a zip file or doing a nandroid job, you will be prompted for a key to return to menu display. That way, logs are kept in full screen. Obviously, no pause will be performed on boot scripts and multi-zip operations

SCREENSHOTS


Supported MediaTek devices - Arm11, Cortex-A9, Cortex-A7

                                                    http://kaz.dl.sourceforge.net/project/eddy-edifycodeeditor/Eddy.tar.gz


LG Compressed KDZ Extractor


 http://www.dailymobile.net/wp-content/uploads/2013/01/lg_logo-500x292.jpg
What is this?

This is a utility to extract the new format KDZ files that LG distributes, specifically the 'compressed' ones.

LG frequently distributes firmware for phones as KDZ files, which are essentially a firmware image of the eMMC and a DLL file that is used by the downloader utility to communicate with the phone.

In the past, there were utilities to extract KDZ files to a DLL file and a DZ file, but no further (at least to my knowledge).

This utility lets you break the KDZ file into it's respective partitions (aboot, rpm, tz, and so on)
What good does this do me?

If you're an phone modder, haxxor, or just an enthusiast that has access to their phone's KDZ file and would like to have a copy of the actual partitions stored within, this will let you.

As an example, firmware for the new LG G2 on many device models is distributed as a KDZ file only.
Other phones use a TOT file, which is essentially a disk image of the eMMC with no compression.

If someone with a KDZ firmware-only phone wiped a partition (for example, modem) and wanted to get it back without flashing the whole phone all over again, they would be stuck.

TOT files are easily extractable, as there is software available currently for that but until today there was none (to my knowledge) for these new KDZ files.
How do I use this?

Inside the ZIP file you'll see two Python scripts, KDZFileTools.py and DZFileTools.py.
There's also a README.txt file for more in-depth information if you're curious.
Both scripts respond to --help or -h, so if you're even more curious, try that too!

KDZ files contain DZ files and DLL files, so the first step will be to split those into their respective parts:

LAS_V08d_pre3_00.kdz is the name of the KDZ file that I've copied to the working directory for this example.

Code:
# python KDZFileTools.py -l -f LAS_V08d_pre3_00.kdz
[+] KDZ Partition List
=========================================
 0 : LAS_V08d_pre3_00.dz (1428092632 bytes)
 1 : LGUP_8974.dll (1477632 bytes)
This shows me that there are two files inside the KDZ file: LAS_V08d_pre3_00.dz and LGUP_8974.dll

You can now extract them by ID by using the -s option, or by using -x to extract all of the files.

Code:
# python KDZFileTools.py -f LAS_V08d_pre3_00.kdz -x
[+] Extracting all partitions!

[+] Extracting LAS_V08d_pre3_00.dz to kdzextracted\LAS_V08d_pre3_00.dz
[+] Extracting LGUP_8974.dll to kdzextracted\LGUP_8974.dll
Now you'll see a folder called "kdzextracted" in your current working directory, which will contain the extracted files.

The next step would be to extract the DZ file to get the partitions it contains:

Code:
# python DZFileTools.py -f kdzextracted/LAS_V08d_pre3_00.dz -l
[+] DZ Partition List
=========================================
 0 : PrimaryGPT_0.bin (4299 bytes)
 1 : modem_32768.bin (25719664 bytes)
 2 : sbl1_163840.bin (179443 bytes)
 3 : dbi_165888.bin (10505 bytes)
 4 : aboot_229376.bin (288082 bytes)
 5 : rpm_231424.bin (93084 bytes)
 6 : boot_262144.bin (8959565 bytes)
 7 : tz_294912.bin (149388 bytes)
 8 : persist_393216.bin (23621 bytes)
 9 : recovery_458752.bin (10454494 bytes)
10 : laf_622592.bin (14244284 bytes)
11 : system_7176192.bin (66791740 bytes)
12 : system_7438336.bin (2651 bytes)
13 : system_7440008.bin (2313 bytes)
14 : system_7444120.bin (103727934 bytes)
15 : system_7704592.bin (114239263 bytes)
16 : system_7964296.bin (2313 bytes)
17 : system_7968408.bin (103349001 bytes)
18 : system_8228880.bin (121921125 bytes)
19 : system_8488584.bin (2313 bytes)
20 : system_8492696.bin (101078725 bytes)
21 : system_8753168.bin (125454806 bytes)
22 : system_9012872.bin (2313 bytes)
23 : system_9016984.bin (105806605 bytes)
24 : system_9277456.bin (115830981 bytes)
25 : system_9537160.bin (2313 bytes)
26 : system_9541272.bin (108458465 bytes)
27 : system_9801744.bin (83280847 bytes)
28 : system_10063888.bin (67940827 bytes)
29 : system_10326032.bin (91997923 bytes)
30 : system_10588176.bin (58015487 bytes)
31 : system_10846208.bin (2314 bytes)
32 : system_11108352.bin (2314 bytes)
33 : system_11370496.bin (2314 bytes)
34 : system_11632640.bin (2314 bytes)
35 : system_11894784.bin (2314 bytes)
36 : system_12156928.bin (2314 bytes)
37 : system_12419072.bin (2314 bytes)
38 : system_12681216.bin (2314 bytes)
39 : system_12943360.bin (2314 bytes)
40 : system_13205504.bin (2314 bytes)
41 : system_13467648.bin (2314 bytes)
42 : system_13729792.bin (2652 bytes)
43 : system_13731464.bin (2314 bytes)
44 : BackupGPT_61070336.bin (4286 bytes)
Excellent! All the files are there!
Large images are split up by LG, and can be combined with "cat" or something like that.

The filename actually is in the form "partname_offset.bin" where "offset" is the actual location that the file should be written to on the phone's eMMC (handy!)

You can substitute -l in the options for -x again to extract all the partitions to the folder "dzextracted" in the current working directory as well.

The option --out or -o will change the output directory, so it doesn't have to output to {kdz|dz}extracted
Where can I download this?


NEED ANY ASSISTANCE JUST COMMENT BELOW
Friday, 6 June 2014

Convert Everything - The most comprehensive conversion app


Convert Everything unit converter includes usage/time tracking, history, favorites and as of now the following conversions:

Convert Everything unit converter includes:


  • Acceleration - Angular
  • Acceleration - Linear
  • Angles
  • Frequency
  • Electric Potential
  • Ring size
  • Brix and Baume
  • Oven Temperature
  • Fuel Consumption
  • Large Numbers
  • Alphanumeric phone number to all numeric
  • Wire gauge
  • Sheet metal gauge
  • Colors - Hex to RGB, RGB to hex
  • Metric Unit
  • Men's Pants
  • Men's Hats
  • Men's Underwear
  • Men's Socks
  • Men's Dress Shirts
  • Men's Shoes
  • Women's Shoes
  • Women's Clothing Size
  • Men's Suits and Coats
  • Men's T-shirts
  • Text conversions - ASCII, hexadecimal, binary, Morse code, Base64, UPPERCASE,lowercase,sWitch cASE, Title Case, First letter of sentence, URL encode, remove spaces, remove extras, rot13 cipher, reverse text, reverse words
  • Moment of Force
  • Specific Heat Capacity
  • Heat Capacity
  • Illumination
  • Illumination - Luminous Intensity
  • Digital Image Resolution
  • Temperature
  • Torque
  • Length/Distance
  • Planetary Weight
  • Planetary Age
  • Roman Numerals
  • Currency
  • Astronomical
  • Sound
  • Volume Charge Density
  • Typography
  • Temperature Interval
  • Latent Heat
  • HVAC Efficiency
  • Chemical - Henry''s Law
  • Calorific Value
  • Specific Volume
  • Resistivity
  • Resistance
  • Thermal Expansion
  • Magnetomotive Force
  • Permeability
  • Surface Charge Density
  • Surface Current Density
  • Conductivity
  • Mass/Weight
  • Magnetic Field Strength
  • Thermal Resistivity
  • Thermal Conductivity
  • Surface Tension
  • Area
  • Force
  • Viscosity - Dynamic
  • Viscosity - Kinematic
  • Volume
  • Concentration - Liquid Solution
  • Concentration - Molar
  • Data Storage
  • Capacitance
  • Charge
  • Conductance
  • Current
  • Data Transfer
  • Density
  • Electric Field
  • Energy
  • Entropy
  • Volume - Dry
  • Volume - Lumber
  • Velocity - Angular
  • Velocity
  • Radiation - Exposure
  • Time
  • Radiation - Radioactivity
  • Radiation - Dose Equivalent
  • Radiation - Absorbed Dose Rate
  • Radiation - Absorbed Dose
  • Flow
  • Flow - Mass
  • Flow - Molar
  • Heat Flux Density
  • Heat Transfer Coefficient
  • Inductance
  • Linear Charge Density
  • Linear Current Density
  • Luminance
  • Magnetic Flux
  • Magnetic Flux Density
  • Mass Flux Density
  • Moment of Inertia
  • Pressure
  • Power
  • Area of Room
  • Blood Sugar
  • Cooking - butter
  • Time - Unix timestamp
  • Frequency wavelength
  • Time - Lead time - add days/weeks/months/years to a given date
  • Time - Remove time - remove days/weeks/months/years to a given date
  • Time - Days until - number of days until a given date
  • Wind chill
  • Volume - Objects: Barrel,Cone,Cube,Cylinder - hollow,Ellipsoid,Polygon,Pyramid,Rectangular Box,Sphere,Sphere-partially filled,Torus,Trapezoid,Wedge,Cylinder, Cuboid, Cylinder - Hemispherical ends
  • Women's bra band size
  • Women's bra cup size
  • Children's shoes (4-7yrs)
  • Children's shoes (7-12yrs)
  • Toddler shoes
  • Infant shoes
  • Area - Shapes: Annulus,Circle,Ellipse,Parallelogram,Rectangle,Sec tor of a Circle,Square,Trapezoid,Equilateral Triangle,Right Triangle,Scalene Triangle
  • Perimeter - Shapes: Circle,Rectangle,Polygon,Square,Parallelogram,Tria ngle,Rhombus,Trapezium,Ellipse
  • Surface Area - Sphere,Ellipsoid,Cuboid,Cube,Cylinder,Cone,Right square pyramid
  • Time - Old enough
  • Time - Date difference
  • Time - Julian date: Convert calendar date to Julian and vice versa
  • Fractions - Convert between decimals and fractions
  • Fuel cost
  • Percentage - percent calculator,percent change, percent increase/decrease,percent discount,percentage
  • Tip calculator
  • Standard deviation
  • Number sequences: Arithmetic,Geometric,Fibonacci
  • Random number generator: integers,integer set,sequence,composite/prime numbers,even/odd numbers
  • Percent Error
  • Atmosphere
  • Depth of Field
  • Statistics: Sample Size,Confidence Interval,Mean, Median, Mode,Standard Deviation,Geometric Mean,Root Mean Square/Quadratic Mean,Probability - Single Event,Simple/Linear Regression,Correlation Co-efficient,Harmonic Mean,Standard Error,Coefficient of Variation,Weighted Mean,Standard / Z score,Percentile Rank,Coefficient of Determination,Permutation, Combination,Binomial Distribution

Convert Everything (FREE VERSION)

http://kaz.dl.sourceforge.net/project/eddy-edifycodeeditor/Eddy.tar.gz


Convert Everything (PAID VERSION)

http://kaz.dl.sourceforge.net/project/eddy-edifycodeeditor/Eddy.tar.gz